Pages

Showing posts with label Bedrooms. Show all posts

Wednesday, October 30, 2013

Getting Cozy: Creative Spaces for Kiddos

When I think about cozy spaces in a home, I don't forget about my boys. They need a place that is cozy and where they can play, read, and be creative in play and in art. Their toys and books usually spread everywhere in our home and don't just stay in the playroom, but I love that we have a space that is colourful, fun and just theirs (besides a cabinet of my craft supplies). 
I have thinking about their space again and wanting to change up a few things. My plan is to *hopefully* turn the closet that is full of random things that don't have a specific place, into a reading/hideout for the boys. To take off the doors and put up a curtain so it is easy to access and hide away. Here's hoping I can find places for all the random junk!
Since I am a planner and love to be inspired by different spaces, I've put together a few pictures of my favourite cozy places for kids to hang out and be themselves.

I think this is my absolute favourite. The teepee, bunting, and colourful rug together make a great room for kids.
http://www.mygrowinghome.com/search?updated-max=2012-02-22T14:41:00-05:00&max-results=7&start=7&by-date=false
Here is a great example of a book nook in a closet. I love the light fixture and the shelves on the side of the wall.
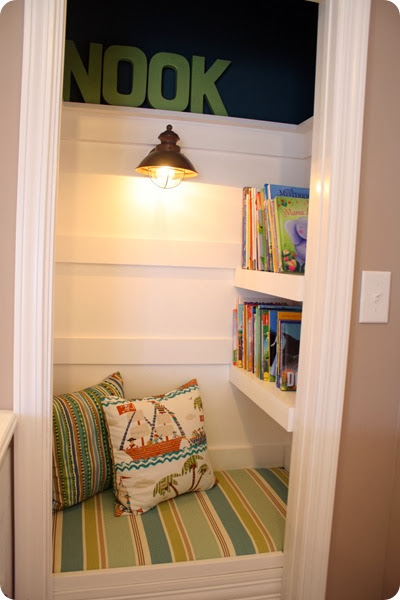
http://thriftydecorchick.blogspot.ca/2011/05/closet-turned-book-nook.html
Here is another example of a great playroom with a teepee in the corner. 
http://6thstreetdesignschool.blogspot.ca/2013/06/my-new-favorite-blue-paint-color.html
What could be cozier than floor pillows that they can cuddle up with a book on? Or in my son's case, jump on? 
http://laurenleonardinteriors.com/blog/category/kid-spaces/
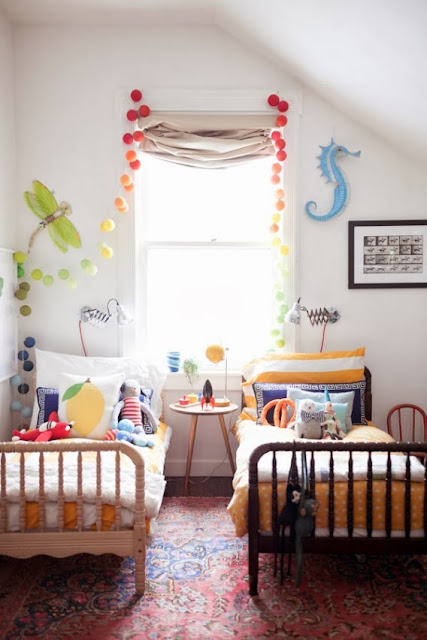
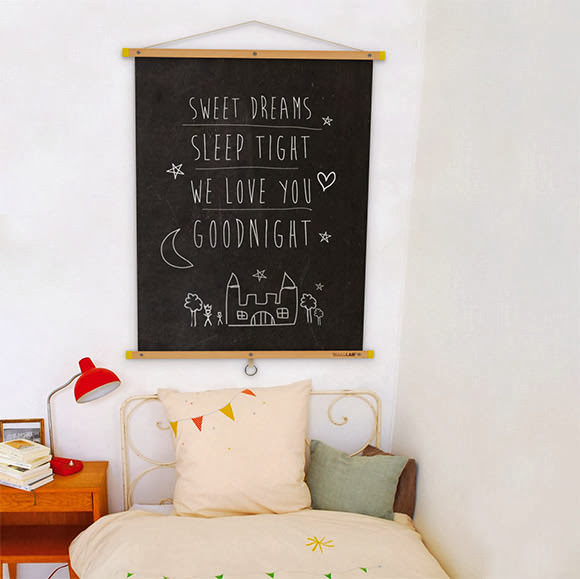
I can't forget about their bedrooms. Our boys don't play in their room; we keep the toys downstairs, but we have books in a bin ready to be read before bed. I want their room to be a place where they can go and feel at rest. Since that is my goal - for them to sleep!! 
http://divaaniblogit.fi/dotsandstripes/2013/05/16/banaanilaivalla-hoyhensaarille/
http://joannagoddard.blogspot.ca/2013/03/san-francisco-apartment-tour-500-square.html
http://www.handmadecharlotte.com/back-to-basics/

http://itsourpinterestinglife.blogspot.ca/search/label/Getting%20Cozy
To catch up on the rest of our Getting Cozy series, click the button above! 

Tuesday, August 13, 2013

Baby Boy Nursery - Part 1

Our baby nursery is finally starting to come together. I've decided to show it in parts because I'm not completely finished yet. It's a work in progress, right?

I first started blogging about this room almost two years ago. At the time, I was planning on decorating it for Sienna but life just got in the way and I never ended up doing anything with it beyond putting junk and odds and ends in there. Everyone needs a room like that in their house!

A year and a half later, it went from looking like this to this:


So much nicer and fresher!

Today I finally put some pictures up on the wall.

 I made the pendant banner with some scrapbook paper that I had on hand. I put it all together quickly with scotch tape and some twine.


I found the colouring page here. I love it because you can add whatever colours you'd like to it. What drew me to it originally was the fact that it was already the colours I was planning on using!

I found both picture frames at Jysk for $5.99 and $9.99. Not too shabby!


I still might tweak it a bit more but for the meantime I'm happy with it.

My husband has been working on shelves for that strange cubby but it's slow going. Hopefully soon since Troy's clothes have been sitting in a basket on the floor! :)


Friday, June 28, 2013

Simple Headboard

I'm back with another easy project that I tackled for our bedroom. This one is all about the headboard.

If you take a few minutes and browse through Pinterest at all the DIY headboards, you will see that there are many different and usually simple ideas for making your own headboard. I don't know if this will stay as our headboard forever. Actually, I know it won't because I like to switch things up a lot, but for right now, I am loving it. 
I simply took two canvases that I had stuck behind the couch in the playroom and stapled them together with our staple gun. 

Then I wrapped a vintage bed sheet that I had found at a thrift store around the canvases and stapled the fabric to the canvas as if I was wrapping a present. 

I hung the canvases on two nails. Since it is so light, I'm not afraid of it falling on our heads and giving us concussions in the middle of the night. 

I love the vintage fabric. The little yellow and grey flowers are light and bright but not too feminine. 
So that is my second easy update. A project that was fast enough to make during the boys' nap time. 

Happy weekend! And happy Canada Day! 

Wednesday, June 26, 2013

Easiest Update Ever

Now that summer is *finally* here, I've been looking around our home, wanting to spruce things up a little bit. Maybe it has something to do with the windows being open and the sun shining through that makes me want to change a few things around our home. As much as I would like to do major changes (aka the KITCHEN), that is just not in the budget or in my 'spare' time (laugh here). Easy updates it is.

First up. Our bedroom lamps.
I also didn't make our bed to get the full picture of this space. Okay. Truthfully, I haven't made our bed for a few days now...

Anyways, back to the lamps! Mainly the lamp shades. I had bought them years ago after Melody gave us these lamp bases. I hate those lamp shades. There is nothing really wrong with them, but I do not like the shape for our space.

So last night, Jesse stayed home with the boys and I went out by myself (it was well needed). After going to the thrift store, I went to Walmart to get a few things. I found myself in the lamp aisle and decided that it was time to do some updating.
M-U-C-H better.
They are a smidgen too tall for the space, but they work for now. Maybe someday I'll get some new lamp bases...and new side tables. These bookshelves are working fine, but they aren't the prettiest thing that I have ever seen. Here's what I have in mind for beside the bed:
So that is my easiest update ever. Also, making the bed and cleaning up the laundry makes a big difference too. :)
On Friday, I'll show you how I made our headboard. Also one of the easiest updates ever (do you see a theme?).

Wednesday, April 17, 2013

Gavin & Cameron's Room Reveal

I'm excited to show you the boys' room today. I put the finishing touches on it this weekend. Well...until I find something else to add to it. :)

You might remember all my ideas for the room that I shared a couple of months ago. Their room isn't "themey" (aka does not have a theme), but it is a nice mix of this and that.
 
 I really did not spend a lot of money to make this room to what it is right now. Maybe $20 total? The best thing about Pinterest and blogs these days, are all the beautiful free prints that bloggers make available to their readers. Just print and frame. 
I love this little gallery wall over Gavin's bed. I still have a few ideas of what to add to this wall, but it makes me happy even how it is right now. The little banners over this wall, the foot of Gavin's bed and over Cameron's crib are all made out of scrapbook paper that I had in my stockpile. 

This is the view of the change table area from Cameron's crib. I added a frame with chicken wire for future pictures of the brothers or whatever else I find to pin up there. :) 
 One more look of the whole room: 
I have been putting the boys down for a nap at the same time every morning and I am happy to report that they both fall asleep peacefully and there are no shenanigans. Can I say the same thing in a few years from now? Probably not. 

If you have a few moments, we would love for you to 'like' us on Facebook or connect with us via RSS feed. Thanks!
 

Wednesday, April 10, 2013

Shelf Tweaking

Tweaking is a weird word don't you think? Tweaking...

...even if it's a funny word, that's what I did to the shelves in the boys' room this week.
You may remember that I had made a mobile for over the change table, but after it fell down on Gavin while Jesse was changing him, I moved it. Plus it scared a few of my nieces...I like the new home better anyways, which you will see soon. That's tweaking, my friends!
When the boys and I were at Michaels recently, I was browsing the cheap bins that they have lining the cash area and found the red letter 'G' - for $1.50! They didn't have a 'C' in the same style, so I kept looking and found a bin full of wooden stamps. And they had a "C", so I scooped it up! Also for $1.50.
The sweet bicycle print was also from Michaels for $3.00, but using my 50% off coupon, I got it for $1.50! Not too shabby.
I found the poem in the frame in Jesse's baby book that his mom had copied down and saved. It's a precious reminder that children are sweet miracles.

So the shelves are tweaked and we will be buying a crib mattress (finally) tonight. The room is slowly coming together! I have ideas for that white mirror, since it seems to just fade into the walls (that are actually a very light green, but look white in the pictures).

The boys have had shared their room for two naps so far. I just put the bassinet in the crib and Cameron and Gavin have slept perfectly. Hopefully that continues!

Do you find yourself 'tweaking' things in your home? Do you think 'tweaking' is a weird word too??

Friday, February 15, 2013

Hits the Spot

I finally made a sweet little mobile for the kids' room. I decided to cut out arrows from the same pack of paper that I used to make the pendant banner that is hanging over the crib. Hence the title of this post. I am saving you from the many other puns that are floating around in my head...not enough space, not enough time. 

But back to the mobile... 
It is a little crooked. I know that. But the little arrows hanging down make up for the lopsidedness. So cute. And it really doesn't look that lopsided in person. 

I started with a plain embroidery hoop, string and arrows that I cut out using my Cricut. 
I plugged in my little pink hot glue gun and just glued the arrows to the string. Easy peasy. 

Then I hung it up over the change table. 
Cute right? 

Now all it needs is a little baby lying on that change table. Come on baby!

Happy weekend! 

If you haven't had the chance yet, swing by and 'like' us on Facebook

Wednesday, January 16, 2013

Banners, Cheap Frames, and Happy Art

Sloooowly but surely I am getting things checked off my mental list because this baby is coming in *here's hoping* five weeks. 
 Here we are, with the baby, as usual, leaning as far over to the right side of my stomach as possible.

I unpacked a small package of teeny tiny newborn diapers on Monday and put them away beside Gavin's huge diapers. That was a reality check! Gavin was even impressed by the small size of the diapers. 

On Monday, I made and hung up a pendant banner over the baby's crib, which is still Gavin's crib as of right now. What is it about banners that just make a room happier? 
 If you look closely, you can see my sweet, sick little baby settling down for a nap to get feeling better! Which is also why this picture is terrible quality. Sorry about that. 
I made the banner with scrapbook paper and threw in some pink tones too, since we don't know if this baby is a boy or a girl. 

Gavin and I also made a quick stop at one of my favourite thrift stores and found these two wooden frames for $1.69 each! Perfect for some happy art that will be hung up on Gavin's side of the room. 
 You can find the Baa, Baa, Black Sheep printable here and You are my sunshine printable here

I am still on the hunt for more frames for Gavin's side of the room, so I'll be doing that in the next couple of weeks, plus finding a couple of baby sleepers for the hospital, packing my bag, cleaning, making a mobile for over the change table, and oh ya...taking a nap or two. :) 
 (via) 
Winnie the Pooh is so wise...

LinkWithin

Related Posts Plugin for WordPress, Blogger...